It’s time for another Traktip!
Email Tokens allow you to change values on an issue, simply by including the token and the new value in an email. So you don’t even have to log in and access this issue.
A little background on email tokens
In the world of programming, tokens are objects that represent something else, in this case a value within Issuetrak. When a token is used in the creation of a webform, the value associated with the token goes into Issuetrak, replacing the token with a value in a particular field. This allows you to capture specific information from an email and automatically populate it into the appropriate field within an issue.
Some real life examples of email tokens at work include being able to receive an email on your mobile phone and then replying to the email indicating that you want to assign an issue to John Jones while also changing the Substatus to XYZ. Email tokens could also enable another software system that sends emails into Issuetrak to set appropriate fields without the need for a programmer to write code to access the Issuetrak API. Tokens open up lots of possibilities.
Tokens and Web Forms
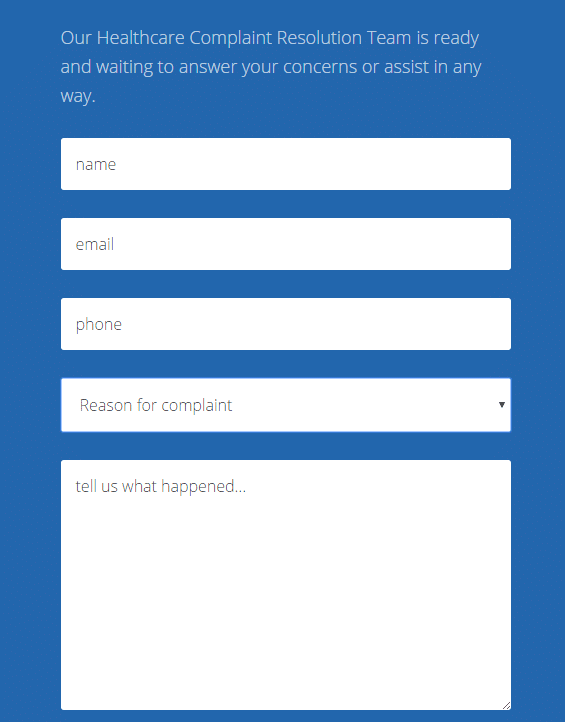
Webforms typically include a dropdown of specific values, a date, or free text option. Webforms are converted into emails. This example of a webform includes three plain text fields for name, email, and phone, a dropdown for the reason for the complaint, and finally a large text field for details.
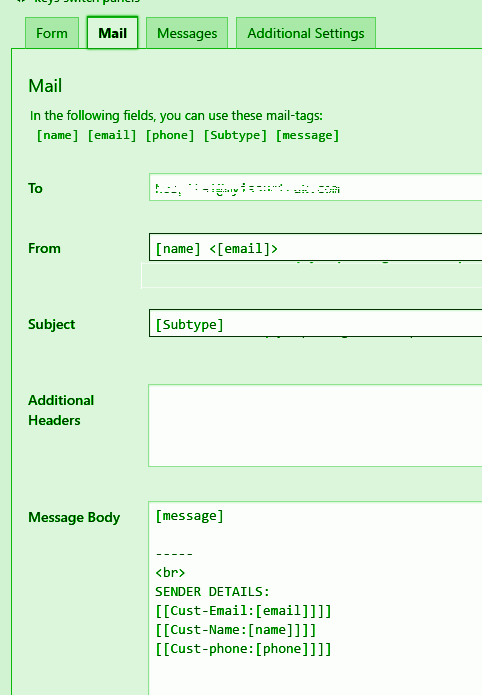
When you format your email that populates from the webform, you’re able to include tokens in the body of that message that correspond to the values from the fields in the form.
In this example, we’ve used email, name, and phone fields from the webform to populate into the tokens Cust-Email, Cust-Name, and Cust-Phone. And while not a token, we have the dropdown of the complaint reason feeding into the subject line of the email. That can then be used by Issuetrak’s incoming email to set the type and subtype value for the issue it creates. (It can also determine assignment or an Issue Template with a process, depending on your IEM settings.)
Setting up your Issuetrak email tokens
Issuetrak gives you pre-defined tokens for Assigned To, Next Action, Priority, Substatus, and Close Issue. You can modify or deactivate those tokens or add tokens for any of your user defined fields.
Tokens are driven by a “Token Identifier,” which is simply a word or phrase that tells Issuetrak which field you want to update.
To modify existing tokens:
- Click the gear button in the upper right-hand corner of the screen to access the settings lightbox
- Select "Incoming Email", and then click "Email Tokens" on the right side of the screen
- Click Edit next to the field token or command token you wish to change
- Adjust the token identifier
- Click Update
To create a new token from a User Defined Field:
- Click the gear button in the upper right-hand corner of the screen to access the settings lightbox
- Select "Incoming Email", and then click "Email Tokens" on the right side of the screen
- Select your UDF from the dropdown list
- Input a token identifier
- Click Add
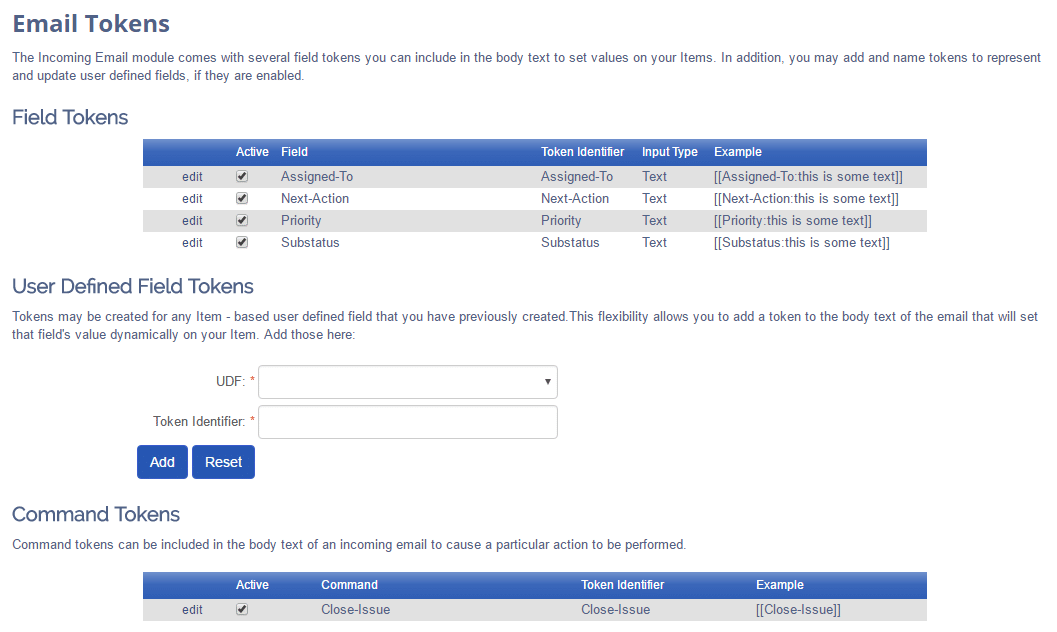
The key is to make sure you use the proper formatting of the token when you use it in the web form or email. All tokens start and end with double brackets, and within the brackets include the token identifier, a colon, and the new value for the field, with no spaces. So the full token string looks like this: [[TokenIdentifier:Value]]
The training document, Working with Email Tokens, provides additional details on using and setting up email tokens.
As always, if you have any questions or would like to see this in action via a quick demo, we are happy to help!


Topics from this blog: Complaint Management Issue Tracking Workflow Customer Support Process Management Traktips Identity Management Tips and Best Practices
Back